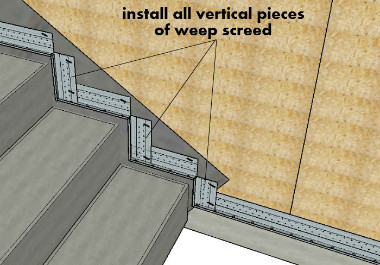
Installing weep screed on stairs is pretty simple if you know the steps that make it go quick. They involve a lot of cutting and time placing the pieces and fastening them to the wall. Here are a few tips on how the process…
Step 1: Measure The Stair Tread
First, you’ll want to measure the stair tread length and cut a piece of weep for that stair. You can measure and cut all the pieces of weep for the entire stairwell ahead of time, if you’d like to.
It will save time and make it a lot easier to install as well.

Step 2: Make Guide Lines & Use Blocks
The next step is to make a mark 2″ from the riser, this will be the point from which we start our weep screed so we have room for the vertical one that comes down later.
Then cut two blocks that are 2″ on one side, so we can rest the weep screed on top of them, making the process of installation much easier on us.

Step 3: Set Weep And Staple Off
Now you can set the weep screed on top of the blocks, making sure the left side of the weep is on your 2″ line and put a staple in each top corner of the flange.

Step 4: Install Horizontal Pieces On Stairs
Install the horizontal runs on all of the treads of the staircase, this saves time and makes putting the vertical weep screed pieces on easy.

Step 5: Measure Vertical Runs
Since we put on our horizontal pieces of weep screed on first all we have to do is measure the distance between the top and bottom pieces and cut a new piece to fit.
Again, you can measure all the pieces ahead of time and cut them out.

Step 6: Install Remaining Vertical Pieces
The last thing to do is to install the vertical pieces of weep for the stairs and you’re done! The finished product should look something like this.


