The paper is a line of defense against moisture and is also referred to as the water resistive barrier in a three coat stucco system. Simple hand tools and attention to minor details are all it takes to install it.
I am laying out the way I would recommend doing it and know that there are many different ways but wanted to keep it simple and straight to the point.
Attaching the paper to the wall is quite simple and a repetitive process, so it’s easy to do and can be mastered quickly. Your main goal is to keep the paper taught and staple it to the substrate, that’s really all there is to it.
The first row is the most important and is critical for the rest of the layers that overlap it. You’ll want it as straight as possible, so the following rows of paper are also straight.
Step 1:
Pull out about a 4′ section of paper to get started with. We will be using the bottom edge like a straightedge so pull out a good amount to get a nice, straight line.
I usually start at an outside corner and work my way around the house. You’ll want to let approximately 1′ of paper hang over the corner like the picture shows.
Step 2:
Make sure the bottom edge of your paper is running along the weep screed line, this will keep your paper straight when you roll it out and fasten it to the substrate.
When your paper is straight, put a few staples in the top edge near the corner, using a similar pattern you would find on a dice.
Step 3:
Roll out the paper and keep the bottom edge along the weep the entire time. Don’t use too much force when pulling either, you could rip the paper off of the staples!
After you have about 5-6 feet rolled out, put another group of staples towards the top, making sure the bottom is straight and there are no wrinkles in the paper.
Keep doing this all the way down the wall and then we will fasten it down more securely and pull it taught.
Then, you'll want to cut the paper off the roll at about that 12" mark, so you can wrap the remaining paper around the corner. Refer to the outside corner section down below for instructions on how to fasten the paper for a wrinkle-free finished product.
Step 4:
After the top of the paper is stapled, you’ll want to fasten the rest of it down, starting in the middle and working your way outwards. The picture illustrates the process, which eliminates bubbles from forming.
First, run your hand down the middle portion of the paper, starting from the top and working downwards.
As you slide your hand down, you are ensuring that it is laying flat against the substrate and there are no major wrinkles. Throw a few staples in the paper after the paper is taught.
Step 5:
Mark the studs using a keel or crayon, blue, red and white are the best colors for the black paper. Use the nails in the substrate to find the studs, you will need these later when you staple off the wire.
Make sure your mark will be visible after you put on the next layer of paper. My lines are below the chalk line.
Installing The Remaining Runs:
After you have the bottom piece of paper on, the rest of the layers are very simple, especially since we know the bottom piece is straight. The minimum overlap for horizontal seams is 4″ but I am going to recommend 6″ because paper is very inexpensive and a larger overlap is cheap insurance, so to speak.
Step 1:
To make things easy, I am going to suggest snapping a line (using a chalk box) along the top edge of the paper.
Measure down from the top edge of the paper 6″ and make a mark on each corner.
For longer walls you can make an additional line in the middle, just hold the string down on the middle mark (with both ends on their marks too) and snap both sides.
Step 2:
Now, unroll a 4′ section of paper and line up the bottom edge of the paper with the line that we snapped on the already attached piece. Put a few staples towards the top of the new paper, right next to the corner, just like you did on the first coarse of paper.
Attaching the next piece is the same as the bottom one, staple the top every 5-6 feet along the top, then work the middle getting rid of any bubbles/creases and work your way outwards.
Papering Around Outside Corners:
Outside corners are important areas when it comes to stucco installation and is oftentimes a starting and stopping point throughout the entire stucco process. Here’s how I would recommend you paper an outside corner…
Step 1:
Make sure the corner is stapled before wrapping it around the corner to prevent bubbling. I have found that putting a staple in the middle of the paper, then the top and bottom and two more in between the middle one and outside ones holds the corner in place pretty well.
Step 2:
Wrap the paper around the corner and hold it there with one hand, take the other one and make a crease where the corner is. This will make a nice corner that is flat and taught.
Step 3:
Then staple the other side of the corner, like we did earlier. Then staple off the edge that remains, starting in the center and working your way to the edges, keeping the paper flat against the wall.
Step 4:
Now you can continue a new wall from the outside corner, making sure that you’re on your chalk line and straight.
You will want to have that 12" excess t hat is going to wrap around the corner the opposite way now, to ensure that the corner is papered well.
What About Inside Corners?
These are a little more tricky than outside corners but the key to
making them nice is to have a straight crease line and make sure the
paper is flat along the wall without any bubbles before you staple
anything off.
Step 1:
Take the roll of paper right up to the inside corner and pin it in the corner. You want to get as close to the corner as possible, so you can have enough overlap on the corner.
Then back roll the paper until you have about 12″ or so of loose paper hanging off of the roll. The picture illustrates what this technique looks like. After you have an adequate amount of paper rolled out, cut the paper.
Step 2:
Now crease the paper right on the inside of the corner, like we did on the outside corner but in the opposite direction. Try to make sure the paper is even and the crease is vertically straight.
Step 3:
The last thing to do is to staple the inside corner of the overlap piece off, starting in the middle, then securing the top and bottom edges and then throwing a couple of staple in between them all, like we did on the outside corners.
Step 4:
Start a new wall the same way we have been doing it right in the corner. This is probably the fastest way to paper inside corners and makes them nice and tidy looking too.
Next, Comes The Windows...
Windows can slow you down a bit when installing the paper and properly flashing them is absolutely critical. We can kill two birds with one stone on this one in a couple of simple steps
Step 1:
You will want to make sure that the window is properly flashed with a minimum of 6″ flashing (sticky preferred). Be sure that it is also installed correctly. The bottom piece should go on first, then the left and right sides, install the window and place the top piece of flashing on after the window is nailed in.
Step 2:
Cut a piece of paper that is 3 feet wider than the WINDOW FRAME which will extend past the flashing 1 foot on each side. Place it under the window flashing and install it how I explained in the beginning of this article (staple top first, then work from the middle outwards).
You can tack the edges of the flashing up with a staple to hold it out of your way while you install the paper. This will make it much easier.
Step 3:
Now, take a razor knife and cut the excess paper off, using the weep screed as a straight-edge so you have a nice clean bottom edge after you have made the cut.
Once the paper is cut tuck it inside the flange of the weep screed and lay it as flat as you can. If you put a couple of staples to hold it, remember where the flange of the weep screed comes up, staples will not penetrate the metal.
*If the window is higher up and will require paper underneath it (more layers), then only staple the top edge so you can lift it up and attach paper underneath it first.
Then you can run the pieces to the edges of the window opening (or window frame), maintaining that 6" overlap over the bottom piece of paper.
The window will be installed around the buildings before you begin papering, I just wanted to illustrate the process without it to simplify it a bit more. Below is a picture of how the window flashing and paper look after it is installed correctly.
About the Author
The Stucco Guy
Ryan—Retired Stucco Contractor
I’m Ryan, a longtime stucco contractor who has spent plenty of years getting dusty, chasing cracks, matching finishes, and figuring out what actually works in the real world.
I created TheStuccoGuy.com to make stucco a little less confusing, help homeowners avoid expensive mistakes, and give you practical answers without all the fluff.
Take a look around, and if something still has you scratching your head, send me a question. I’m always happy to help.
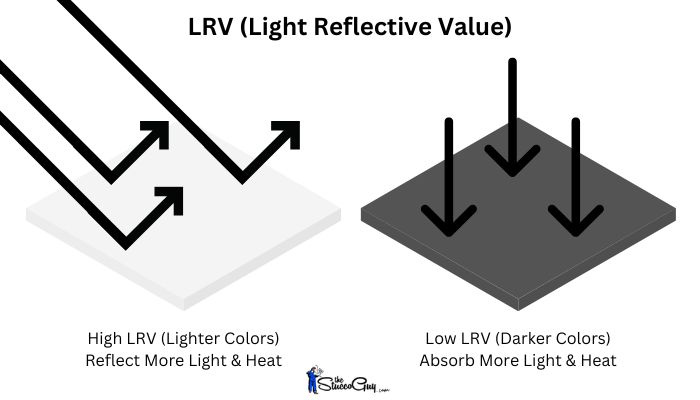
Explore Light and Dark Bases for Stucco Colors Explained! with a clear visual reference for comparing stucco colors and narrowing down the right finish.