The three coat stucco system has been around for quite a while, but there are a lot of people who might be unfamiliar with it, and I wanted to shed some light on what it is and how it works.
In this article, we will dive into some of the details of the three coat stucco system and by the end of this article, you will have a much better understanding of what it is and how it works.
What Is 3 Coat Stucco?
Three coat stucco is a specific stucco system that refers to three different coats of the system: the scratch coat, which provides a rough surface to bond to, the brown coat, which evens out the wall and the finish coat, which provides visually pleasing textures and colors to the walls. It is usually 7/8" - 1" thick and is the most durable type of stucco system out there today.
The Different Layers of the 3 Coat Stucco System:
The name would imply that there are three coats that make up this system, right? Well, that is not entirely true, as there are actually 4 main layers that make up the system:

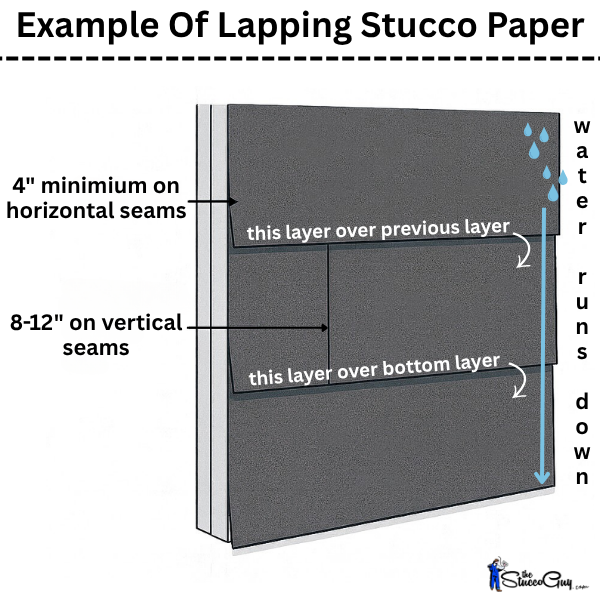
- Lath - The waterproofing layer that consists of water-resistant (tar infused) paper and the wire. (Not referred to as a part of the 3 coat system)
- Scratch Coat - The scratch coat is the first base coat that is applied over the lath and lines scratched into it for the next coat to stick to.
- Brown Coat - The brown coat is the second base coat and is applied over the scratch coat, providing a more even base for the finish coat.
- Finish Coat - This is the final coat of the stucco system and is usually colored and textured for a nice, finished look.
The Name: The three coats that are referred to, however, are the scratch coat, the brown coat and the finish coat, the three layers that consist of applying the "mud" portions of the system. Mud is a general term referring to cement or acrylic coatings or products.
The Scratch Coat: The scratch coat, is the first base coat that goes on the wall after lath and is attached to the wall via the wire, which holds the material in place. It is typically made up of cement, sand and water and goes on the wall at a depth of around 3/8" - 1/2".
Horizontal scratch marks are applied to the material, while it is wet and provides a good surface for the next coat (the brown coat) to stick to. The ridges will give the next coat something to bond to and provides better adhesion than a smoother coat.

The Brown Coat: The brown coat is the second base coat that is applied to the wall or walls and is made up of the same three ingredients of cement, sand and water. It is applied at around the same thickness too, ranging from 3/8" - 1/2" and hangs on to the horizontal scratch marks make in the scratch coat.
This coat is more even and smoother, though, as it is the base for the finish coat that will be applied over this. This is done using a longer tool that evens out the highs and lows in the wall and after the material has set up and gets slightly hard, it is then floated to further even out the high and low spots in the wall and also compacts the surface slightly.

The Finish Coat: The final layer of the 3 coat stucco system, is referred to as the finish coat and is where the aesthetic versatility of stucco comes to life and is the part you see on stucco clad buildings.
There are a variety of textures and colors that are available these days and this particular layer in the system, is usually the one that people talk about and are most interested in. The finish coat not only adds to the building's visual appeal but also provides an additional layer of protection in the system.
The Application Process
Mixing the Material: The materials have to be made on site and will require you to use a mixing drill or a mortar mixer, in most cases. This is true for both the scratch and brown coats, as well as the finish coat.
Applying the Coats: Each coat can be applied by hand using a hock and trowel or sprayed on the walls using a mortar pump and then worked by hand with various trowels and other tools.

Drying and Curing: The curing process is also another important part of the process and is basically the amount of time the material takes to dry. You want cement based materials like the scratch and brown coats to dry slowly and evenly, if possible, which helps to mitigate cracking issues and provides greater strength.
Pros & Cons of the 3 Coat System...
Advantages: The advantages of a three coat stucco system include things like durability, strength and fire resistance. The durability of this system is time tested and has proven itself for a hundred years or more, in certain situations. The strength it has against impact damage is also another strength it has over other systems, as well as being fire-resistant.
Disadvantages: Despite its many advantages, the 3 coat system is labor-intense and time-consuming, when compared to other types of systems. The costs of applying stucco to your walls, including this type of system, can be higher compared to other siding options, and the application and repair process also requires a higher skill level, which you may need to hire out.