Repairing Hairline Cracks In Exterior Stucco – A Helpful Tutorial!

Many homes that have stucco as an exterior coating have cracking issues, but most of them can be repaired quite easily.

There are different kinds of cracks that appear and knowing how to go about fixing them is half the battle.

There are different kinds of cracks, distinguished mainly by their size and pattern on the wall itself.

One can determine the cause of the crack by looking at the wall’s design, the size of the crack and the pattern.

Hairline cracks are anywhere from 1/16 of an inch to 1/8 of an inch wide (typically) and are easily and effectively repaired using caulking and paint, in most cases because it is the most economical approach for most people.

What You Will Need For This Project:


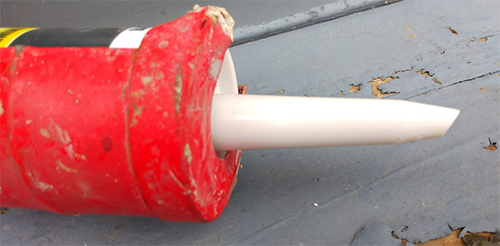
Cut Tip Of Caulking Tube, Like This:

The first step is to cut the tip of the tube of caulking as small as possible, at an angle, if possible.

I included this as a step because it is oftentimes overlooked and can make a huge difference in the amount of time it takes to complete the project, how much cleanup there will be, the finished product,etc.

Then load the caulking gun with the tube and squeeze out some of the caulking, so your ready to go and have an idea of how much material is going to come out.

Cut Tip of Caulking Tube

Helpful Tip: The smaller the tip, the easier and cleaner it will be to apply the caulking, the less cleanup you will have to do and the better the repair will look.

Helpful Tip: If the crack and the area around the crack has moss, staining or excessive amounts of debris visible, then using a softer wire brush first to remove the debris and clean the area is recommended.

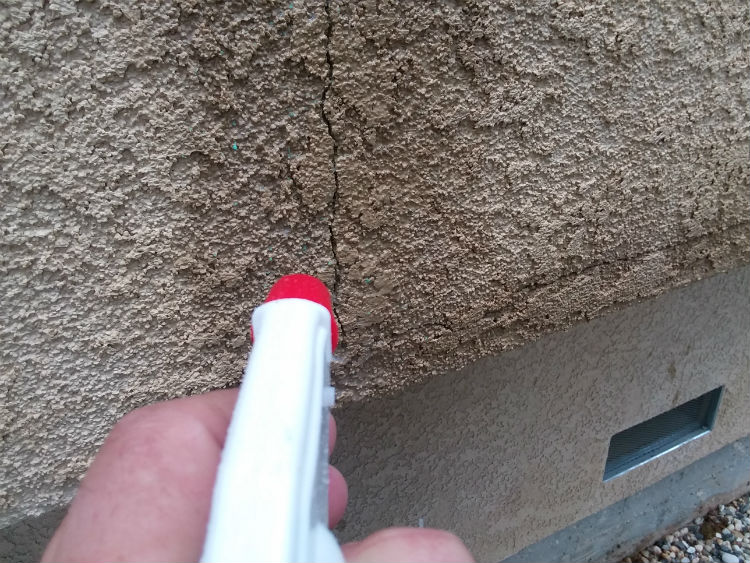
Step 1: Wet The Wall Down Before You Do Anything...

Wet Down Wall Around Crack In Stucco

First, you will want to wet down the wall where the crack is and around the area of the crack.

Water will help with any standing dust in and around the crack and also help to move the caulk around, make it squeeze into the crack and will allow you to wipe off the excess a lot easier.

Step 2: Apply The Caulking To The Crack

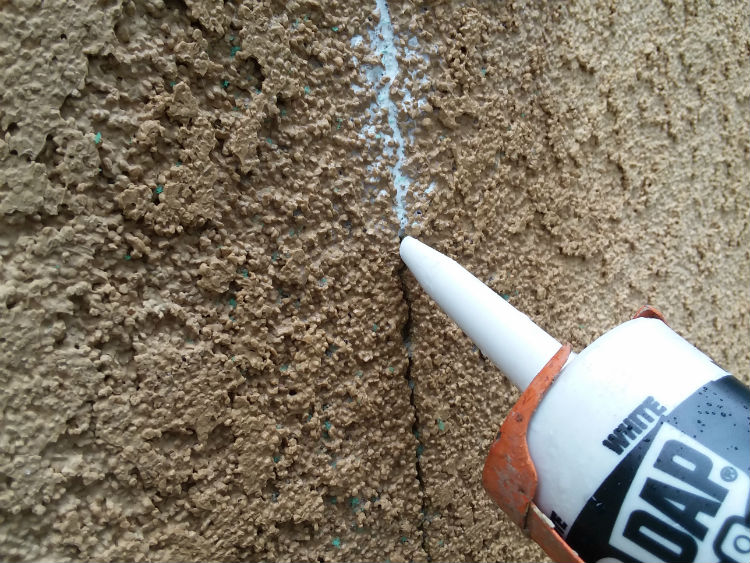
Apply Caulking To Crack

Next, you will want to apply a bead of caulk along the crack in an even and generous manner.

Use the angle on the tip to your advantage, it will be easier to fill the crack this way.

Be sure to have a consistent bead without any gaps, you will want the entire crack to be covered in a bead so it is sealed entirely.

After The Caulk Is Applied...

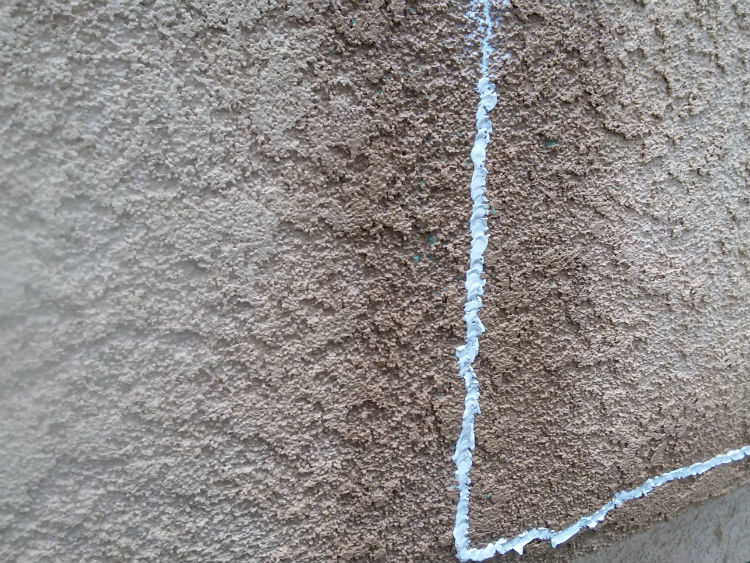
Caulk Applied To Stucco Wall

After you apply the caulking, it will look something like this (above photo).

This is where cutting the tip of the caulking tube carefully comes in handy, the smaller the crack, the smaller the opening on the tip of the caulking tube should be.

This will keep things neat and make the job come out a lot better in the end.

Step 3: Spread The Caulking Into The Crack Using Your Finger:

Spread Caulking Into Crack

After the caulk is applied, take your finger and rub the caulk into the crack.

Try to go all directions, in order to fill the crack entirely.

Try to avoid spreading the caulk all over the wall, if you can do so, it will make the next step much easier.

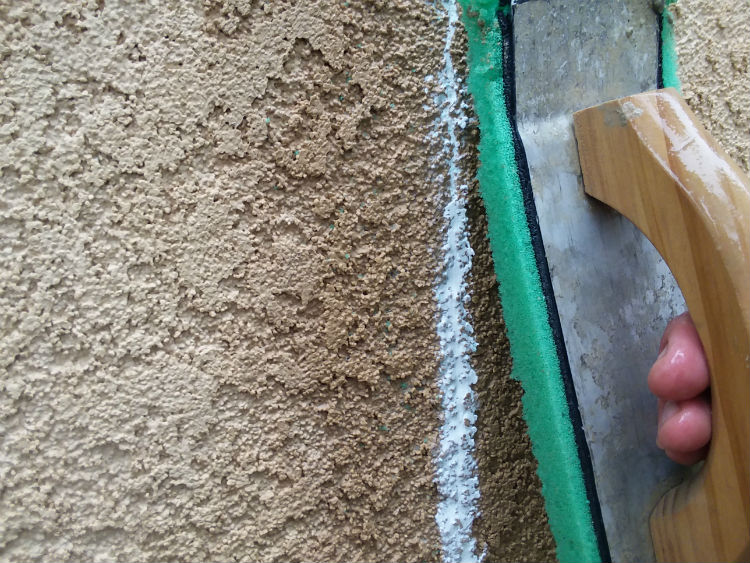
Step 4: Wipe Off Excess Caulking

Clean Off Excess Caulking With A Green Float

Now, take your sponge, rag or green float and saturate it in the water.

Ring it out a little bit, but keep most of the water inside, it is better to have more water than not enough.

Use the rag or sponge to clean up the area around the crack, while keeping the caulking inside of the crack itself.

Do not worry if you are shy on material here because we will end up applying a second coat that is textured and will fill in the rest of the material you need.

Just make sure that the entire crack is filled and you didn’t miss any spots, this is critical in this step!

Helpful Tip: The final product should just have the caulking inside the crack and nowhere else.

Try to clean around the edges as good as you can for a better end result.

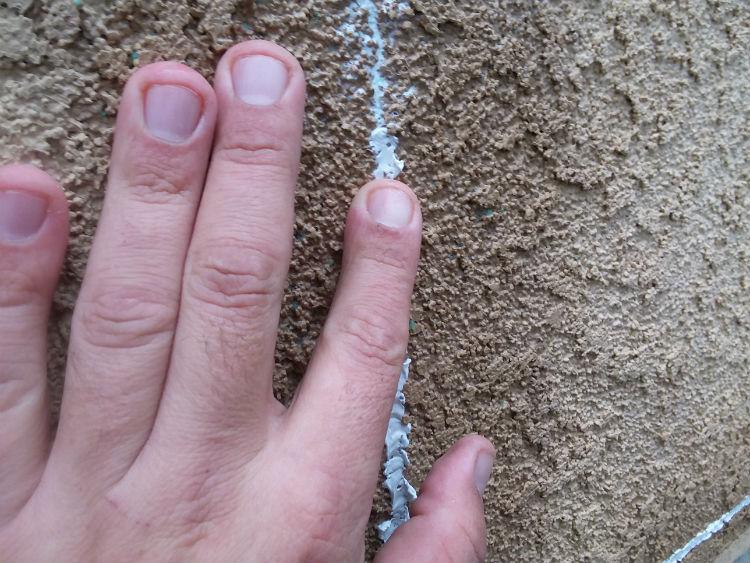
You Will Have Something That Looks Like This:

Stucco Crack After Wiping Off Most Of The Excess

After you wipe off the excess coating using your green float, rag or sponge, you will have something that looks a little bit like the picture above.

Most of the caulking is sitting inside the crack which is where we want it and the watery white residue around the crack is water that has just a very small amount of caulking in it.

This will have to be removed if you are not planning on painting, otherwise you will see a slight difference in color after you are done.

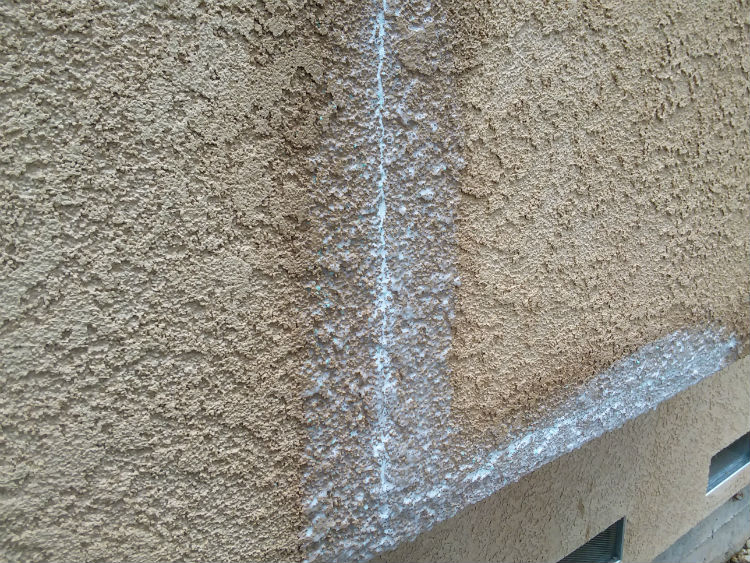
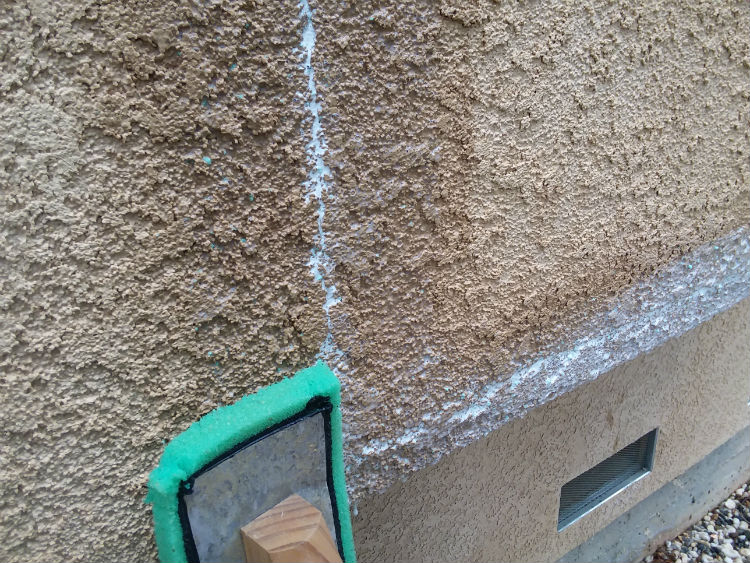
Step 5: Clean Off Excess Water/Caulk Residue Around Crack...

Wipe Off Excess Water And Caulking Residue From Around Crack


Let The Caulking Dry

Let it dry for a day, or a few hours, depending on the instructions , weather, temperature, etc.

Caulking has a tendency to shrink up a bit, which will work to our advantage, in this case.

We will apply another coat of caulking the same way we did previously but add a little texture this time around, to match the existing texture.

The second coat of caulking is optional and is usually not carried out by most people, as it takes more time, energy and resources. Sometimes one application of caulking is enough to fix the crack.

Texturing The Second Bead Of Caulking (Optional):

After we apply the second bead of caulking and wipe off the excess, we will want to add a bit of texture to make the repair blend in a little better.

Before you try to texture to the wall, play with it on a piece of cardboard to try and simulate the texture and find out what methods (dabbing with a brush, using a sponge, etc.) will match the existing texture the best.

  • If you have a smooth texture, then this will be easier to do and will only require (in most cases) to keep reapplying caulking until it is flush with the finish and make sure there are no “hard lines” in the caulking, everything should blend in naturally.

  • For moderately heavy to heavier textures, a brush used in a dabbing motion would match the existing texture better.

    Experiment first, like I mentioned earlier to see what method works the best for your texture. A sanded caulk would work better for rougher stucco textures and be easier to achieve a more seamless repair.

Step 6: Apply Color To The Repair (Optional):

For the repair to be complete, you will need to apply a matching color coat on top of the area you fixed and possibly the entire wall, so it blends in better.

Most folks just paint the wall and is probably the easiest method and most cost effective one.

If you want to avoid painting, then look into a fog coat (traditional cement based finish) or an acrylic finish that was used on your home (custom color matched) that has the aggregate taken out of it.

You can achieve this by running the material through a mesh paint screen, which will keep the color in tact but remove the aggregate to make a custom acrylic paint.

Helpful Tip: It is hard to match the color of stucco exactly.

It is porous and the color matching programs that are used these days will pick up on the “shadowing effects” that the uneven surface of the finish has. 

Keep this in mind if you are planning on painting and need to have your stucco color matched.

Helpful Video That Explains The Basics Involved:

About Me Image
About the Author

The Stucco Guy

Ryan Retired Stucco Contractor

I’m Ryan, a longtime stucco contractor who has spent plenty of years getting dusty, chasing cracks, matching finishes, and figuring out what actually works in the real world. I created TheStuccoGuy.com to make stucco a little less confusing, help homeowners avoid expensive mistakes, and give you practical answers without all the fluff.

Take a look around, and if something still has you scratching your head, send me a question. I’m always happy to help.

Leave a Comment:

49 comments
Anonymous says

Thank you so much for sharing this detail. One item of note is that the DAP product you used is NOT what DAP recommends for dealing with stucco cracks.

DAP recommends using their Elastopatch Smooth Flexible Patching Compound. https://www.dap.com/products-projects/products/elastopatch-smooth-flexible-patching-compound/

I am sure you have had good results or you would not have kept using the same product. But perhaps you would have even better results using the product that DAP recommends?

Reply
    The Stucco Guy says

    Hey there, thank you for your thoughtful comment! You’re right, DAP does recommend their Elastopatch Smooth Flexible Patching Compound for stucco cracks, and it’s great to hear your insight. I’ve found success using the DAP product I mentioned, but I agree that elastomeric caulks like Elastopatch are typically better for flexibility and durability. They can be a bit trickier to work with when it comes to blending, but they’re worth the effort. I personally like to use Big Stretch for elastomeric applications, as it offers a nice balance of workability and performance. I appreciate your suggestion and will definitely consider trying Elastopatch in my future projects. Thanks again for contributing!

    Reply
Terri Stanley says

I had our 1920’s Art Deco house re-stuccoed last summer. I asked for a smooth finish to match the existing stucco. I was told I could choose between an acrylic or cement stucco. Neither would need painting, the acrylic would be more sturdy if the house settled more, but as the house has settled years ago and current stucco from 1920 wasn’t cracking, cement would match better and with the addition of expansion joints should work well.

This summer, spider cracks have started on most walls, Vertical cracks at first and now even some horizontal cracks. I called the contractor to come and look at them and basically was told it is my fault for choosing cement and that as there was a vapor barrier behind the stucco it wasn’t a problem. I think if I decide to sell the house, the buyer will not believe this story. The stucco cost $50,000 and I just can’t afford to have it redone if there are issues or I wait years to see if they get larger. Any suggestions? I think as they see me as a little old lady ( 70 yrs) in a wheelchair, they can tell me whatever.

Reply
    The Stucco Guy says

    Cracks showing up this soon usually point to how the stucco was applied or cured, not just the type used. Cement stucco can work well on older homes, but require proper prep, reinforcement, and curing to avoid spider cracks. A vapor barrier doesn’t prevent cracking, it just controls moisture. If the cracks are mostly in the finish coat, they’re likely cosmetic, but it’s still worth having a second contractor take a look. It may be something that can be fixed without a full redo.

    Reply
Amitava says

I have corner cracks in the external stucco around a wood fire place. Crack width is half inch wide, vertical, along the corner folding. What material and process I should use to repair the half inch wide crack.
Is there a repair material that can match the color of the existing stucco?
Thanks.
Amitava

Reply
    The Stucco Guy says

    Hi Amitava! For a half-inch wide crack, use an exterior-grade patching compound or a stucco repair mix. First, clean the crack and widen it slightly to remove loose material. Fill it with the repair mix, smooth it out, and texture to match the surrounding stucco. For color matching, you can use pre-tinted stucco repair products or paint the patched area after it cures. Let me know if you need more guidance!

    Reply
Dan says

Thank you very much for this post!

Reply
ABRAHAM G. says

THE BEST DEMONSTRATION HOW TO REPAIR STUCCO. I AM VERY GLAD

Reply
Great video...thank you but you don't show the says

Great video…Thank you…but you don’t show the caulk tube with the name of what you are using

Reply
Jeff says

Wow great post! Thank you for the pictures as well that made things easier to understand! I liked your post in the comments about being able to work the extra bit with your finger to get the caulking in the crack. I am thankful your knowledge was able to educate us on this topic! Keep writing! Great job!

Reply
Linda Forrest says

This was very helpful and I wish I could hire stucco guy to do my house lol

Reply
Vulcan alex says

For narrow cracks how important is it to get the caulk deep inside it? Is it only required to seal the surface? This article is very good as are the responses to comments. Thanks

Reply
    The Stucco Guy says

    You want to get caulking into the crack if possible, that way it seals it up properly. I wouldn’t spend a lot of time trying though, usually working the caulking in with your finger will get the job done pretty well.

    Reply
Linwood says

Thank you for the article! This is a great help!

Reply
Stephen Kotleba says

Can I use Henrys All Purpose for the hairline cracks or should I stay with the DAP you sugessted?

https://www.homedepot.com/p/Henry-10-1-oz-212-Clear-All-Purpose-Patch-HE212202/202091011

Reply
    The Stucco Guy says

    I personally have never used that product so I can’t say whether it will work or not, sorry about that Stephen…

    Reply
Stephen Kotkeba says

I was wondering if Henry’s All Purpose Crystal Clear Sealant will alps work for a smooth stucco hairline cracks? Can you advise on this, or should I stay with the Dap Alex that your link shows?

Reply
Tony says

I’ve recently started a stucco installation and repair business and happened upon this article. I’d like to thank you for taking the time to put together such good content. It’s always nice to see how others tackle these kind of issues. I think the portion of the post on texturing is so very important. Having a repair that sticks out like a sore thumb is the worst.

Thanks again!

Reply
Carlos says

Thank you for the suggestions I just wanted to no can you fog coat over a lighter color to darker color

Reply
    The Stucco Guy says

    In most cases, you can Carlos. Just try a smaller area first to see how it comes out before you fog coat the entire building. Good Luck!

    Reply
Michael Evans says

Thank you

Reply
    The Stucco Guy says

    Hiya, You’re very welcome, Michael! I’m glad you found the tutorial helpful. If you have any questions about the repair process or need further assistance, feel free to ask. Happy repairing!

    Reply
Kat Connelly says

Hi Ryan
Your information was very helpful! My deceased husband was a General contractor and now it’s up to me to maintain my home. Now I’m greatful for your simple instructions and thankful for my knowledge and artistic skills . Your explanation and method is easy to follow!
Thank you !

Reply
Anonymous says

Very helpful! I am a widow and have a crack that is leaking when it rains. I now now that I can fix this myself. Thanks!

Reply
Janet says

Is silicone caulk preferable to elastomeric for cracks?

Reply
MAZ says

I LOVE, LOVE, LOVE you for taking the time to help us out here in how-do-I-do-this land! I will be back when I am stumped again. Thank you so, so, so much, Ryan!
PS the ‘caulk’ lesion was with it’s wt in gold! Thank you so much!

Reply
Joey says

Thank you for the is info. I am still on the planning stage, and this will help me to decide.

Reply
Patti Carlile says

I have a semi-stucco question. I liked your article and steps on how to repair stucco cracks but would like to go a step further. I need and plan to repair the cracks on my home, but also need to re-paint the entire house. The existing paint job is starting to flake off. Should I just paint over the entire house or should I try a high pressure wash to remove old loose stucco and paint? Any suggestions on the proper way to prepare to paint stucco? Thanks so much.

Reply
    The Stucco Guy says

    Hey Patti,
    Yes, you will most certainly have to pressure wash the entire house with a 3,500 psi sprayer first to remove all the loose paint. If you paint over the stuff that is flaking off, the new paint will do the same thing because there is no bond.

    Reply
Don Stewart says

I just had my house repainted and now can still see the outline of the cracks in the stucco. Short of having the stucco torn off and redoing it, is there anything else to do. The painter did fill the cracks prior to painting but the result is not great. Thanks!

Reply
    The Stucco Guy says

    Hey Don,
    Cracks should be repaired in the cooler part of the day, when they are at their largest. As it heats up, the stucco expands and closes the gaps and they will come right back the next day. If a sealant was used on them then usually two coats is necessary because they have a tendency to shrink so the second coat eliminates a lot of that. Be sure that the sealant is only in the crack and not on the surrounding surface (by using a damp sponge/cloth). These are the best tips for a successful outcome and without being there can’t really say any more. Sorry.

    Reply
Anonymous says

Great articles..

Reply
    The Stucco Guy says

    Thanks for reaching out, Thank you so much for your kind words! I’m glad you found the article helpful. If you have any questions about repairing stucco or need further tips, feel free to ask!

    Reply
Dana says

I am a house painter and need to repair a small corner where the stucco was damaged. ( only about 3″x1″) can I mix of a little grout and put it on there or does it need to be stucco?

Reply
    The Stucco Guy says

    I would recommend a pre-mixed stucco patch mix, which you can get for about $7 at Home Depot. The texture will match much better and the end result will blend in seamlessly, if the existing texture is matched.

    Reply
ed says

Previous owner did poor stucco crack repair. Lots of dried excess stucco. Tried sandpaper. No luck. How to remove dried stucco?
Thanks for the site.

Reply
    The Stucco Guy says

    Try a wire brush, it will usually remove the stucco if it is fairly fresh (1-2 weeks old) you can use a drill with an attachment as well and if that doesn’t work, then try a grinder with a masonry disc or diamond cup and start over. Hope this helps.

    Reply
MM says

I should have read this post first. As I did the silicone in the crack but I just pushed in with my finger and it spread on the outside of the crack also. Then I painted and you can see 6 huge streaks as I repaired over the garage and it looks terrible. I have done 4 coats on the wall and still see the streaks where the silicone was applied.
Is there anything I can do to repair this? 🙁
thanks

Reply
    The Stucco Guy says

    You would have to remove the silicone and try it again, it’s the only way. Try a putty knife and a wire brush.

    Reply
Anna says

HI,
How do I know if the cracks are superficial or because of structural problems?
Thanks,
Anna

Reply
    The Stucco Guy says

    It is a tough thing to do without seeing it in person. Usually the size of the crack is a good indicator, on top of where you live, what is around the crack (windows, doors,etc.) so it is hard to answer but most of the time, cracks are not a serious issue (small ones anyways).

    Reply
deAnna says

I have many of these hairline cracks. Do you think they go through the two other coats under the finish coats?

Reply
    The Stucco Guy says

    It’s hard to say without seeing it in person, but they usually tend to not. If the crack goes through the other two coats, they will usually be larger, more visible cracks.

    Reply
Carl Cross says

Nice article. How important is fine crack repair 1/16″ or less?

Reply
    The Stucco Guy says

    Thanks Carl,

    The cracks you are talking about are usually typical and nothing to worry about. If you were to fix them, it would be for aesthetic reasons and nothing more. If they get larger over time, then I would take a closer look at them and investigate the cause.

    Reply
Robert says

THANK YOU VERY MUCH!!!

Reply
    The Stucco Guy says

    Your very welcome Robert.

    Reply
    Anonymous says

    Thanks, the sponge and water are a great idea

    Reply
      The Stucco Guy says

      It does work most of the time, remember to “add texture” to the caulk for a more seamless fix.

      Reply
Add Your Reply